Installing & Configuring WSUS
In this post, we will discuss how to install and configure WSUS in a Windows Server 2012 R2 environment.
Difficulty Level: Intermediate
Post-Deployment Configuration
Configure WSUS Settings via Group Policy
In short, you have the tools to manage what, when, and from which sources Microsoft Updates are deployed to your systems.
Additional resource: Features of Windows Server Update Services
My WSUS system will have 1 vCPU, 4 GB Memory, a 40 GB C:\ drive and a 100 GB W:\ drive.

Close the Group Policy Management Editor then right-click the policy then click Enforced.
Depending on your domain policies these new GPOs may take some time to apply to all targeted systems.
Additional Resource: The Group Policy Update Conundrum
Next steps:
Configure WSUS Computer Groups
Approve Updates
Difficulty Level: Intermediate
Topics
Install the WSUS Server RolePost-Deployment Configuration
Configure WSUS Settings via Group Policy
What is WSUS?
Windows Server Update Services (WSUS) is a server role available in the Windows Server OS. It enables administrators to deploy the latest Microsoft product updates. Administrators can fully manage the distribution of updates that are released through Microsoft Update to computers and servers in their network.In short, you have the tools to manage what, when, and from which sources Microsoft Updates are deployed to your systems.
Additional resource: Features of Windows Server Update Services
Installing the WSUS Server Role
I will be installing the WSUS Server Role on its own dedicated Windows Server 2012 R2 virtual machine. It has already been added to a domain and all latest Windows Updates have been installed.My WSUS system will have 1 vCPU, 4 GB Memory, a 40 GB C:\ drive and a 100 GB W:\ drive.
Additional resources: WSUS 3.0 SP2 System Requirements
Ensure the account you will install the WSUS Server Role is at least a local administrator on the server. Since I work in a domain environment, I like to setup a dedicated service account.
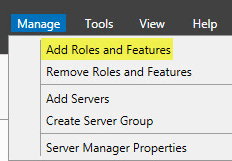
Open Server Manager and click Manage then Add Roles and Features.

Click Next.
Click Next.
Select your WSUS server and click Next.
Scroll to the bottom and select Windows Server Update Services.
A popup box will appear requesting confirmation of additional roles and features to be installed. Click Add Features.
You will see that multiple roles are now selected including Windows Server Update Services. Click Next.
Some features will already be selected due to the previous step. Click Next.
Click Next.
WSUS needs a database to store WSUS Configuration and update metadata. The WSUS database can be a local or a remote SQLServer. For a local database it will use Windows Internal Database (WID) which is a limited version of SQL Express that does not have a GUI or management interface. The WID database is a file (SUSDB.dbf) stored in C:\Windows\wid\data\. Microsoft recommends using the WID database.
Additional Resource: Installing WSUS Serve Role on Windows Server 2012 with Microsoft SQL Database.
Leave WID Database and WSUS Services selected and click Next.
Check the box to have updates stored locally on your server. If you do not select a location then approved update in WSUS will be downloaded by the client computers from Microsoft Updates.
Add the path location of where to store them and click Next.
Click Next.
Leave the default Role Services selected and click Next.
WSUS does not require a reboot to finish installation so you can leave that box unchecked. If everything looks correct click Install.
The installation took roughly 5 minutes to complete. Click Close.
Post-Deployment Configuration
Once the WSUS Server Role is installed there are a set of Post-Installation tasks that need to be performed. In Server Manager click the notification drop-down and click Launch Post-Installation tasks.
Wait for the Post-deployment Configuration to complete its tasks. Mine took roughly 2 minutes.
Note: If setting up SCCM (System Center Configuration Manager) alongside WSUS do NOT launch WSUS. Doing so could cause issues with the SCCM installation.
The Post-deployment Configuration is now complete and we are ready to launch the WSUS console. In Server Manager go to Tools then Windows Update Services.
Click Next.
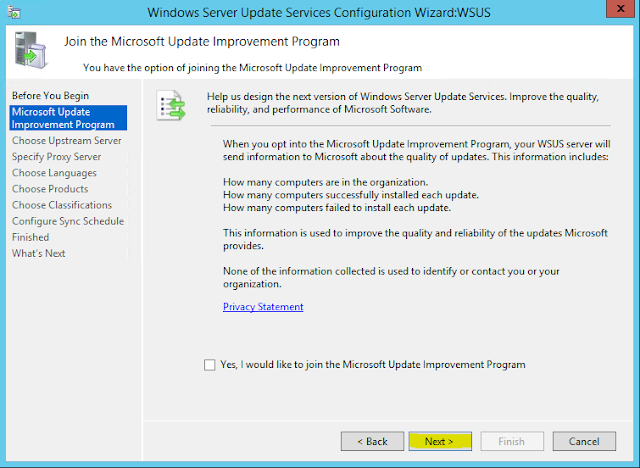
Check or uncheck the box to participate in the Microsoft Update Improvement Program. Click Next.
If this is the first WSUS server in your environment then select Synchronize from Microsoft Update. If this is a second WSUS server (such as an alternate location or part of a cluster) and you want to sync with another WSUS server you would use the second option and input the other WSUS server's connection info. Click Next.
Enter proxy server information if you require one to access the internet. Click Next.
Click Start Connecting.
Once it completes click Next.
Select your desired language(s) and click Next.
Select the products you want to download updates for. You can add/remove products later. Click Next.
Select the update classifications you want to download and click Next.
Setting up a Sync Schedule means WSUS will contact the upstream server (either Microsoft Updates or another WSUS server) and downloads metadata information of available updates based on the previous steps' classifications. You can leave this set to manual or change to automatic. Click Next.
Select Begin initial synchronization and click Next.
Click Finish.
Congratulations! The WSUS console is now configured. You can see the status of the initial synchronization. More statistics and information will populate as WSUS pulls data.
Configure WSUS Settings via Group Policy
We will create a Group Policy Object (GPO) that will be applied to a specific Organizational Unit (OU). This policy will tell the targeted systems to pull Windows Update information from our WSUS server instead of directly communicating with Microsoft's update servers.
Note: If you are not in a domain environment then the following steps must be completed manually on each target system via Local Security Policies.
Open Group Policy Management for your domain then right click the OU you want to create these policies for. Click Create a GPO in this domain, and Link it here…
Enter a name for the GPO and click OK.
Right-click the policy and click Edit.
Expand to Computer Configuration > Policies > Administrative Templates > Windows Components and click Windows Update.
In the right pane find the setting named Configure Automatic Updates, right-click and Edit.
Click Enable then select option 3 – Auto download and notify for install and set the install day and time. Click OK.
Right-click on Specify intranet Microsoft update service location then Edit.
Click Enable then enter the FQDN of your WSUS server in the following format. Click OK.
http://FQDN of WSUS server:8530
Close the Group Policy Management Editor then right-click the policy then click Enforced.
Depending on your domain policies these new GPOs may take some time to apply to all targeted systems.
Additional Resource: The Group Policy Update Conundrum
Conclusion
Congrats! We have successfully installed and completed the initial configurations for our WSUS server.Next steps:
Configure WSUS Computer Groups
Approve Updates


Post a Comment